If you have arrived at this webpage, it is likely, that you are currently attempting to remove EasyTune from your computer. Rest assured, you have come to the appropriate location. We have compiled a comprehensive guide consisting of three straightforward methods to assist you in how to uninstall EasyTune. Regardless of your level of technical expertise, we aim to simplify this process for you. Therefore, let us commence.

What is EasyTune from Gigabyte?
Before delving into the methods of uninstalling EasyTune, it is imperative to comprehend its nature. EasyTune functions as a system optimization tool meticulously designed to enhance the performance of your computer. While it may prove advantageous in certain circumstances, numerous users perceive it as superfluous or even somewhat intrusive. If you have concluded that EasyTune no longer aligns with your requirements, it is time to bid it farewell.
EasyTune, developed by Gigabyte for their motherboards, essentially serves as a utility for performance tuning and monitoring. Its primary objective is to furnish users with a convenient and efficient means of overclocking their system, monitoring performance, and fine-tuning system settings for optimal operation.
With EasyTune, you acquire the capability to adjust CPU and memory frequencies, voltage levels, and fan speeds, all in the pursuit of extracting the utmost performance from your system. It also offers real-time system monitoring, displaying crucial information such as CPU temperature, fan speed, and voltage. Furthermore, users have the option to save their preferred settings as profiles for swift and effortless access.
Also Read: 7 Tips: How to turn off auto swipe on Instagram
It is crucial to acknowledge that EasyTune is available in various versions, including EasyTune 5, EasyTune 6, and EasyTune 10, each offering distinct features and compatibility with diverse Gigabyte motherboard models.
Upon installation of EasyTune on your computer, it generates several files and folders, typically residing in the “Program Files” directory on Windows systems. These encompass files such as EasyTune.exe (the principal executable file), ETCall.dll (a library file for communication with system hardware), ETdrv.sys (a system driver for hardware control), and ETSvr.exe (a background service for system performance monitoring). Additionally, EasyTune establishes numerous registry entries and settings to configure the software and ensure its proper functioning.
How to Uninstall EasyTune?
Method 1: Uninstall via Control Panel
The Control Panel provides the most straightforward technique for uninstalling EasyTune. Please follow the way below
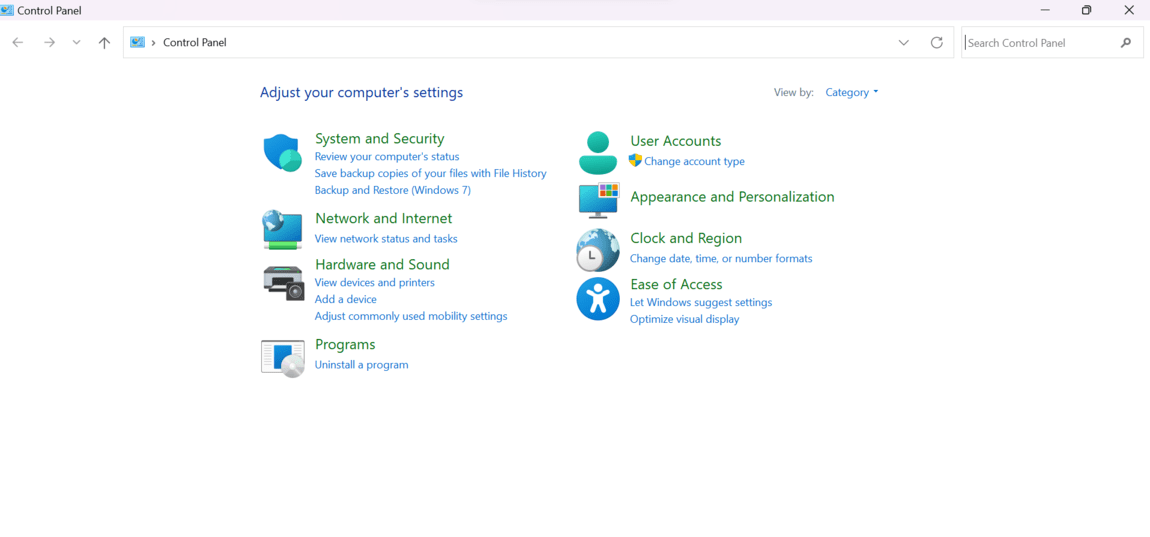
1. Access the Control Panel on your particular computer. You can discover it by entering “Control Panel” in the search bar of your Start menu.

2. Navigate to the “Programs” section within the Control Panel and select “Uninstall a program“.
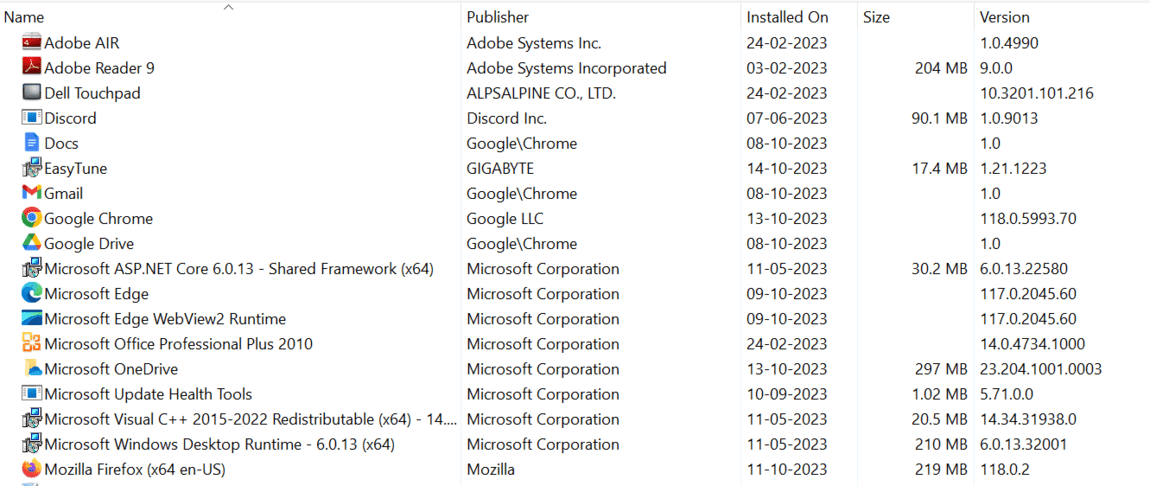
3. Discover “EasyTune” in the list of installed programs. Click on it and then choose the “Uninstall” option.

4. To complete the uninstallation process, carefully follow the instructions displayed on your screen.
Also Read: Unleash the Power: How to Add Dashboards to Unleashed X
Method 2: Use the Uninstaller Tool
Gigabyte, the creator of EasyTune, offers an uninstallation tool that streamlines the process of How to uninstall EasyTune. The following steps outline how to utilize this tool:
1. Identify the EasyTune installation directory on your computer. By default, it is located in “C:\Program Files (x86)\Gigabyte“.
2. Within this directory, you will discover an application titled “Uninstall“. Execute the uninstaller by double-clicking on it. (Note: Some device may not have this file)
3. Adhere to the instructions provided by the uninstaller to effectively remove EasyTune from your system.
Also Read: 50 Fun Commands: How to Make Alexa Mad?
Method 3: Manual Removal
It may be required to manually delete EasyTune in some cases. This method necessitates a higher degree of competence and should be used with caution. The technique for how to uninstall EasyTune is outlined in the following steps:
1. Exit EasyTune and any connected programs.
2. Go to the installation location, as described in Method 2, and delete the whole EasyTune/Gigabyte folder.
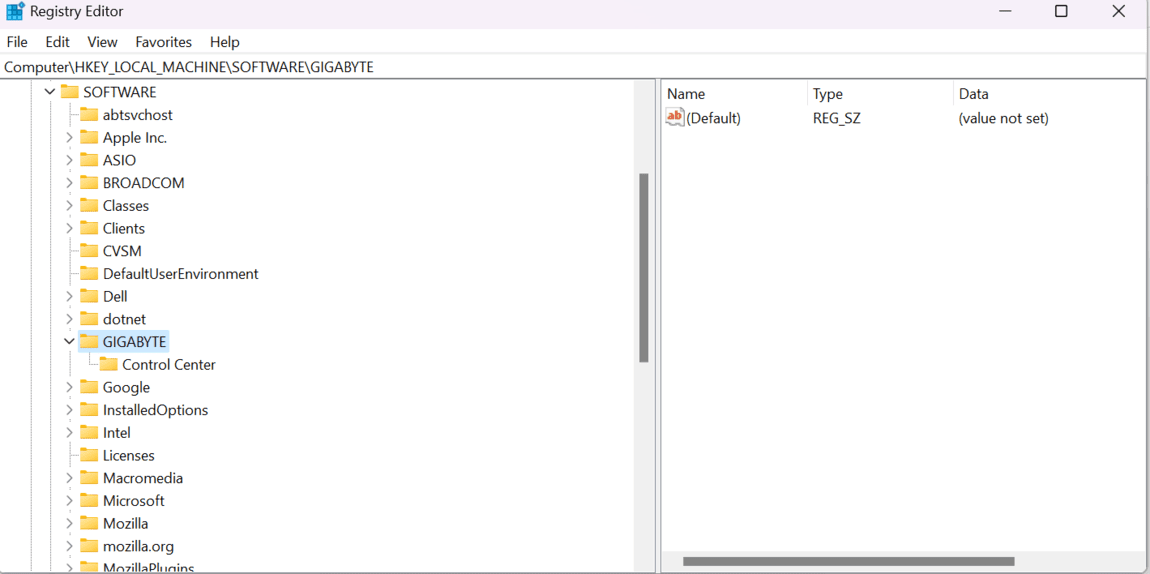
3. Open the Windows Registry Editor (by entering “regedit” into the Start menu) and delete any EasyTune-related registry entries. Use extra caution during this step, as changing the registry might influence the stability of your system.

Also Read: 13 Proven Strategies: How to Block Mind Reading Technology?
Things to remember for How to Uninstall EasyTune
When uninstalling EasyTune, it’s important to consider the following crucial points
- Back over Important Data: Previous to making any changes, it’s judicious to produce a backup of any critical data on your computer. Although uninstalling EasyTune shouldn’t affect your data, it’s always prudent to be prepared.
- Use the Official Uninstall Method: It’s recommended to use the sanctioned uninstallation system handed by EasyTune or through the Windows Control Panel. This ensures proper and thorough junking.
- Terminate Running Processes: Ensure that no active EasyTune processes are running in the background. You can corroborate this by checking the Task Manager and closing any affiliated processes before pacing with the uninstallation.
- Cleave to Uninstall Instructions: If EasyTune provides specific uninstallation instructions, it’s important to follow them. This may involve certain ways or prompts during the uninstallation process.
- Reboot Your Computer: After uninstalling EasyTune, it’s judicious to renew your computer. This helps exclude any remaining traces and ensures a clean system.
- Check for Residual lines: After the uninstallation, completely examine your computer for any remaining EasyTune lines or flyers. Remove them manually to ensure a complete uninstallation.
- Consider the Use of Uninstall Software: If you encounter difficulties with the standard uninstallation process, you may conclude to use third-party uninstaller software to effectively remove EasyTune.
- Exercise Caution with Registry drawing: When dealing with the Windows Registry, it’s important to exercise caution. However, you can manually clean any registry entries associated with EasyTune, If you’re comfortable doing so. Alternatively, you can employ a dependable registry cleaner tool.
- Corroborate Successful junking: After the uninstallation, corroborate that EasyTune no longer appears in the list of installed programs in your computer’s Control Panel.
- Assess System Stability: Test the stability and performance of your computer after uninstalling EasyTune to ensure that the junking didn’t beget any issues.
Also Read: 7 Steps to safely Bye-Bye Temu: How to delete Temu account?
Benefits of Uninstalling EasyTune
Uninstalling EasyTune might have colorful benefits, including:
Enhanced System Stability: The disposal of EasyTune might perform in a more stable and secure computer system.
Reduced Resource Consumption: EasyTune can use a large volume of system resources. These resources can be liberated by removing them.
Augmented Compatibility: Some users have witnessed compatibility issues with certain apps, which were fixed by uninstalling EasyTune.
Streamlined User Experience: For people who do not have advanced specialized knowledge, controlling their system without EasyTune may be a simpler task.
Also Read: The Finest 8 Methods: How to Unlock SIM Card Without PUK Code?
Common Issues with EasyTune
While EasyTune is beneficial for some, it has several flaws, including:
System Instability: Overclocking and system modifications can occasionally result in crashes or instability.
Incompatibility: As previously stated, EasyTune may not work properly with other software.
Unwanted Updates: EasyTune updates have been noted to be bothersome by users.
Resource Hog: It has the potential to demand a substantial amount of system resources.
Also Read: What is Carrier Hub and How to Uninstall It: 8 Essential Methods
Alternative Software Options
Still, you may be aiming for optional software solutions, If you have decided to discontinue the use of EasyTune. Presented below are several alternative options that serve the same purpose
- MSI Afterburner: An extensively honored tool for overclocking and monitoring system performance.
- CPU- Z: exercise this program to cover the performance of your CPU and other system factors.
- SpeedFan: A software tool designed for fan control and temperature monitoring.
- Open Hardware Monitor: Offers a straightforward approach to monitoring hardware sensors.
- Intel Extreme Tuning software: This software enables the overclocking and monitoring of Intel-based devices.
Also Read: Revive Old Friendships: How to un-snooze someone on FB?
Final Thought
We’ve covered three methods for uninstalling EasyTune from your PC in our detailed TechyNerd Article. The option is completely yours whether you like the Control Panel’s simplicity, the offered uninstaller tool, or the manual scraping procedure. Always remember to back up your data before commencing the removal process, and use caution when navigating the complex terrain of the Windows Registry.
FAQ’s
What is EasyTune engine service?
EasyTune Engine Service is a crucial component linked to Gigabyte’s EasyTune software, facilitating hardware monitoring and overclocking. It’s essential for EasyTune’s proper function, usually installed automatically with EasyTune. This service monitors CPU, GPU, memory, and motherboard performance metrics, providing valuable data. However, if you’re not using EasyTune, you can uninstall EasyTune Engine Service. Keep in mind that this action forfeits your ability to utilize EasyTune for monitoring and overclocking. To learn how to uninstall EasyTune, follow the appropriate steps based on your system requirements.
What does EasyTune 6 do?
EasyTune 6 by Gigabyte is a powerful system tuning & overclocking utility for enhancing system performance. It allows users to monitor & adjust critical settings like CPU clock speed, memory frequency, & voltage. Users can easily overclock their CPU & GPU, with a convenient one-click feature. For those who wish to remove it, instructions on how to uninstall EasyTune are available. EasyTune 6 caters to both experienced overclockers & beginners, offering real-time monitoring & performance optimization while ensuring system stability.
Why gigabyte EasyTune auto tuning not working?
Gigabyte EasyTune’s auto tuning may encounter issues for several reasons. Ensure you’re using the latest version of EasyTune from the Gigabyte website. Verify that your system meets the auto tuning requirements, as it’s limited to specific Gigabyte motherboards and CPUs. Prioritize system stability by running a stress test before auto tuning. Close any conflicting software programs. If issues persist, reset EasyTune to default settings, update your BIOS, or seek assistance from Gigabyte support. Additionally, maintain proper cooling and ensure your power supply matches your system’s needs, and monitor system performance post-tuning.
Why EasyTune engine is restarting?
The EasyTune Engine may encounter restart issues due to various factors, primarily stemming from software glitches, especially in older versions. These reboots can also be triggered by conflicts with other software programs or underlying hardware problems within the CPU, motherboard, or other components. Troubleshooting steps include updating EasyTune to the latest version, reinstalling the software, disabling conflicting overclocking or system monitoring programs, and updating the BIOS. If these efforts are unsuccessful, reaching out to Gigabyte support for assistance is advisable. For how to uninstall EasyTune, seeking guidance from Gigabyte support can facilitate the process. To prevent recurring restarts, avoid overly aggressive system overclocking, ensure proper cooling, match your power supply to your system’s needs, and carefully monitor your system’s stability post-overclocking.

